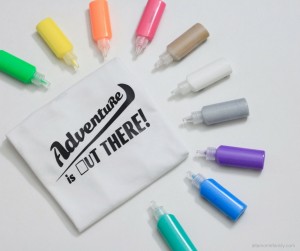
Make these fun, playful T-shirts using your Cricut Explore (or Cricut Explore Air) and iron-on vinyl. Customize with dimensional fabric paint to make your design pop!
Cricut Supply List and Options
- Cricut Machine or any electronic cutting machine that can read or convert layered SVG files (we typically use a Cricut Explore Air or Cricut Maker)
- Cricut Iron-On HTV | or | Smart Vinyl (if cutting without a mat)
- Cricut Tool Set (we used the weeding tool and spatula)
- Cricut StandardGrip Machine Mat
- Cricut Premium Fine Point Blade
- White Cotton T-shirt (pre-washed if it’s new)
- Dimensional fabric paint (optional)
- Iron
- Ironing board
- Dish towel
If using Cricut’s infusible ink system or dye sublimation:
- Cricut Infusible Ink Transfer Sheets
- Cricut Tool Set
- Cricut StandardGrip Machine Mat
- Cricut Heat Press (make sure the temp reaches 400°F or 205°C) or Cricut Mug Press (if you’re decorating a mug)
- Cricut Customizable Blanks (if doing sublimation — from mugs, shirts, totes bags, ball caps, and more)
- Cricut Heat Resistant Tape

Instructions for Iron-On HTV Vinyl:
- Download our free digital cut file and upload in Cricut Design Space
- Since this is not an SVG file (it is a PNG file), you will need to “clean up all white spaces”, including the white space between the letters, before finalizing your upload (using Cricut Design Space Select & Erase Tool)
- Upload image as cut file (vs print-then-cut file)
- Re-size image in Cricut Design Space according to your desired size
- Cut out a piece of iron-on vinyl making sure you have padded an extra 1.5 inches on each side
- Attach iron-on vinyl to Cricut StandardGrip Adhesive mat, shiny side down
- Save and press “Go”
- Follow instructions, load your mat, making sure the dial on your Cricut Explore machine is set to “Iron-On Vinyl” and you’ve selected “Mirror Image” before proceeding
- After the machine has completed the cutting process, remove the mat
- Using the Cricut Explore weeding tool, begin weeding out the negative part of the iron-on vinyl
- If needed, use the Cricute Explore spatula to remove the plastic film (that contains your design) from the mat
- Attach your design (plastic film) onto the T-shirt, right side up (make sure you’ve pre-washed the T-shirt if it’s new)
- Follow instructions on Cricut Iron-On Vinyl instruction sheet while preparing your iron and ironing board
- After pre-heating the ironing board using your iron, place the T-shirt on the ironing board, then place a dishtowel on top of the design (to protect the plastic film and the T-shirt from excess heat)
- Continue to follow instructions on Cricut Iron-On Vinyl instruction sheet regarding how long you will need to keep the heat on the design in order for it to set (including flipping the T-shirt inside out before re-ironing, if needed)
- Once the design has completely set on the T-shirt, let it cool, then carefully peel off the plastic film
Link to project inspiration: Iron-On Vinyl Tutorial [Adventure Is Out There!]
For Personal Use Only: We created this free digital cut file for your personal, non-commercial use only. Please do not alter in any way. Kindly read our full Terms of Use.