Isn’t it amazing how many beautiful designs and world-renowned artwork can simply begin with…a dot?
Although we’re not here to teach you how to become a famous artist (maybe we could inspire you, at least), we’re happy to show you what big of a difference even a small [digital] dot could make!
Today, let’s learn how to create our own backgrounds using Google Docs (via Google Draw).
For this project, we’ll create a polka dot background!
There are a few ways to access Google Draw, and here are the most common ones that we have found (and used):
- Option 1: Open up Google Docs, then go to File > New > Drawing (a new Google Draw window will appear)
- Option 2: Go straight to the Google Draw URL: https://docs.google.com/drawings/create
- Option 3: Create a shortcut button on your desktop for Google Draw
So, let’s get started…
How To Create Your Own Backgrounds Using Google Draw
This project involves 2 parts:
I. Creating The “Gridline Template”
II. Creating The Design
Ready to get started? Don’t worry, it’s really not as complicated as it seems. We included a lot of screen shots to help you along the way–and if you’re still unsure, please drop us a comment and we’ll do our best to respond as we’re able.
How To Create A Gridline Template In Google Draw
It’s always helpful to start with a Template. While we think that it’s this part of the project that takes the longest, we believe it’s a good investment of your time as templates are so versatile and can be used for many other projects / applications down the road.
- Open up Google Draw
- Go to File > Page Setup > Custom and type in the dimensions 11 x 8.5 (make sure you select “inches”)
- We selected these dimensions to make your design more versatile.
- When you’re done with the project, you can always save it as a PDF and send to your printer to create your own custom giftwrapping paper!
- You can also save it as a PNG and crop and re-size it for use in many applications like gift tags, labels, greeting cards, and more!
- We selected these dimensions to make your design more versatile.
- Next, we will need to create our own basic guides since (at the time of this post), Google Draw does not have any guides, rulers, or gridlines
- Go to Insert > Shape > Shapes (or click on the Shapes icon) to insert a rectangle
- Re-size the rectangle so that it fills the entire page / canvas
- Click on the “Line” icon to “Insert A Line” down the center of the rectangle, from top to bottom, to establish your vertical center. Repeat this process from left to right, to establish your horizontal center.
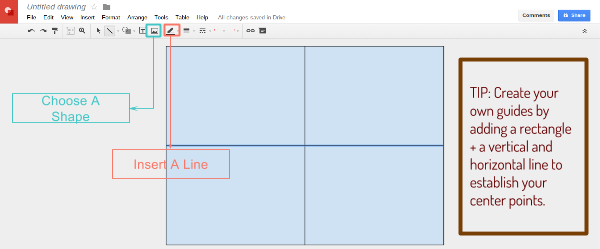
- We can now see the 4 quadrants of the rectangle using the basic horizontal and vertical guides!
- Insert another rectangle so that it only fills the entire top left quadrant.
- Consider changing the “fill color” of your smaller rectangle so that you could easily distinguish it from the other objects on your canvas (we changed ours to white).
- Insert a line down the center of the small rectangle, from top to bottom, to establish your vertical center. Repeat this process from left to right, to establish your horizontal center.
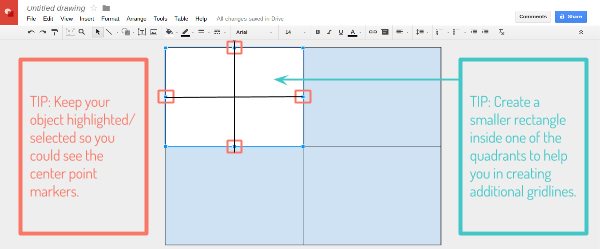
- Using the top left quadrant of the smaller (white) rectangle, repeat the process by inserting another rectangle.
- This time, we used the “fill color” lavender and added a vertical and horizontal line to establish our center points.
- TIP: You can keep repeating this process in your own future projects to achieve your desired “gridline granularity”.
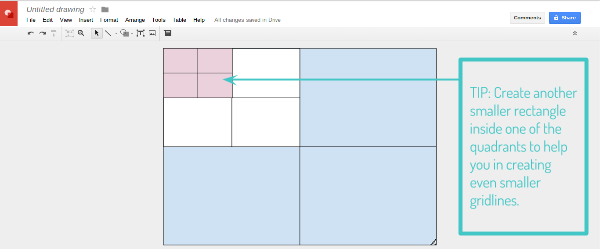
- Delete all other objects, leaving only the main vertical and horizontal guides as well as the small (lavender) rectangle and its own vertical and horizontal guides.
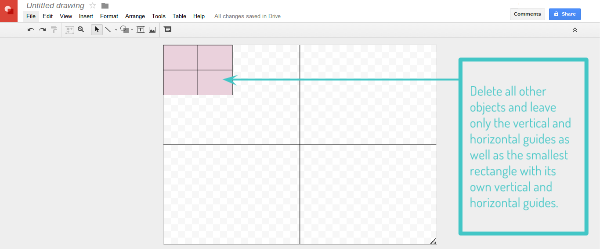
- Group the elements of the small (lavender) rectangle
- Select the small rectangle + the small vertical and horizontal lines inside it and go to Arrange > Group
- Copy the grouped object and paste 3x to create a total of 4 small rectangles and arrange them in a row, from top to bottom (as seen below)
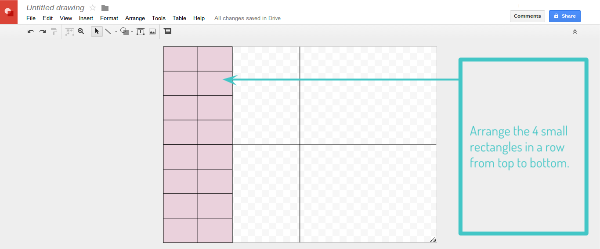
- Delete the main vertical and horizontal lines; then, group all 4 rectangles to make 1 long rectangle (with gridlines inside).
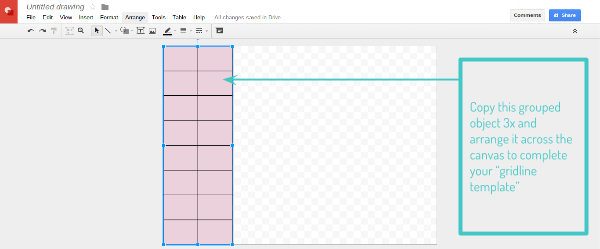
- TIP: You can hold down the “Ctrl” key* and individually select each of the 4 rectangles within your grouped object to change the “fill color”. For this project, we will change the “fill color” to white.
- *If using a Mac, we think it’s the “Command” key, but please double-check to be sure.
- Copy and paste the grouped object 3x and arrange it across the canvas to complete your 8.5 x 11 “gridline template”.
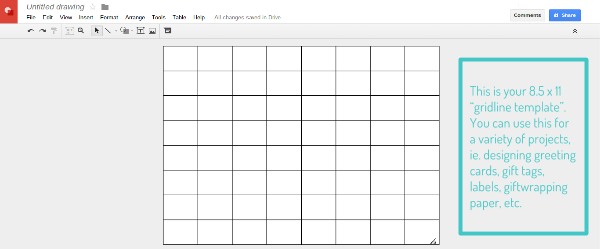
Congratulations! We now have our very own 8.5 x 11 template on Google Draw!
TIP: You might want to save this Template and make a copy of it whenever you’re creating a New Project.
How Do I Make A Copy Of A File In Google Docs / Draw?
It’s easy! Just go to File > Make A Copy and rename your new project!
How To Create A Background Design In Google Draw
Now that we have our very own template, we can start adding our very own design–in this case, polka dots!!!
- Go to Insert > Shape > Shapes (or click on the Shapes icon) and select the circle
- TIP: Click to insert the circle without worrying about its size in the beginning. Then, hold down the “Shift” key while re-sizing your circle. This way, the shape remains a circle and it doesn’t turn into an oval.
- Re-size the circle according to your desired size and position it where it “snaps” right into the intersection of your template’s vertical and horizontal lines
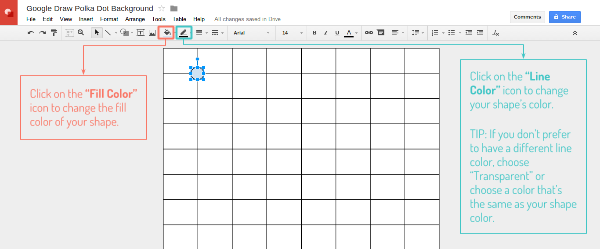
- Copy and paste the same circle so that each intersection on the top row of your canvas has a circle snapped right into place
- Follow the tips above if you wish to change the circle’s color. For this project, we used a shade of pink.
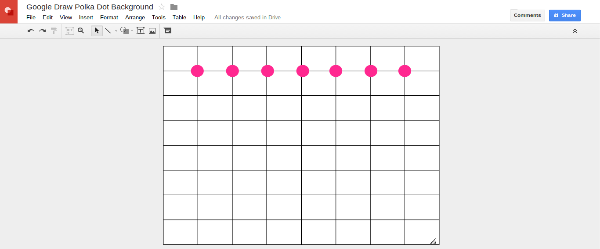
- Follow the tips above if you wish to change the circle’s color. For this project, we used a shade of pink.
- Repeat Step 3 for every row and intersection on your canvas
- TIP: Hold down the “Ctrl” key to select each of the dots on the first row, then copy and paste them onto each of the remaining rows, making sure that they are snapped right into place (right at the intersections).
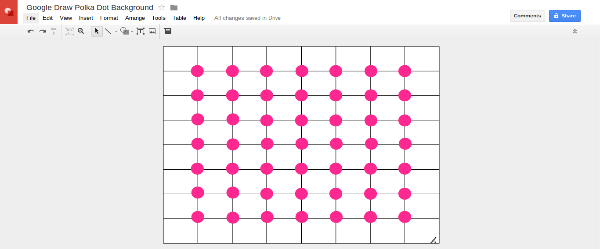
- TIP: Hold down the “Ctrl” key to select each of the dots on the first row, then copy and paste them onto each of the remaining rows, making sure that they are snapped right into place (right at the intersections).
- It’s now time to delete the “gridline templates” in the background. Remember that this template is comprised of 4 identical rectangular elements, so all we would need to do is to delete each of them.
- TIP: Just click outside one of the circles and you will see a highlighted / selected rectangle; simply delete that rectangle! Repeat this step for all other remaining rectangles! You will be left with your polka dot images against a transparent background.
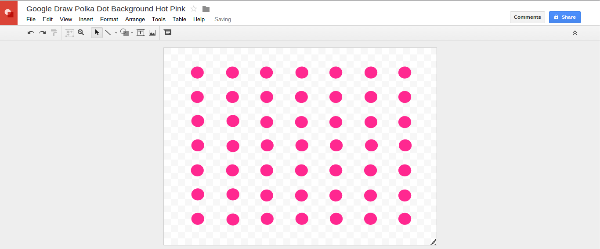
- If you go to File > Download As and select either a PDF or a PNG (image file), your project will look like pink polka dots on a white background.
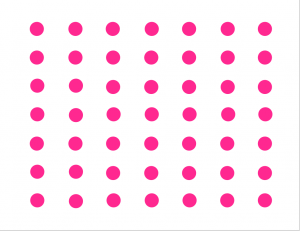
- If you would like to add a background color behind the polka dots, simply create a rectangle that fills your entire canvas, remove the “line color” of that rectangle, and select a “fill color” of your choice. Be sure to select the rectangle and go to Arrange > Order > Send To Back so that your rectangle goes behind the polka dots. For this project, we added a purple background.
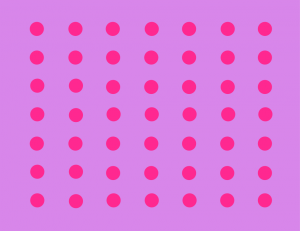
- If you’re wondering about the “empty space” around the sides, you could easily crop this area off after you have downloaded the file as a PNG or JPG and have inserted it into a New Project. For printing purposes (if you’re saving the entire project as a PDF), this “empty space” would be outside the printable area, anyway (and you could always just trim it off with scissors or a paper cutter), so it should be a non-issue.
- TIP: Just click outside one of the circles and you will see a highlighted / selected rectangle; simply delete that rectangle! Repeat this step for all other remaining rectangles! You will be left with your polka dot images against a transparent background.
We’re all done!
If you’d like to download the FREE printable purple and hot pink polka dot background that we just created, simply click on the button below. You could use it as giftwrapping paper, scrapbook paper, and all kinds of other stuff!
Looking for something else?
Check out our previous post if you’d like to learn how to make your own card in Google Docs.
Have fun creating!!!
Disclosure: As of the time of writing this post, AltamonteFamily.com is by no means affiliated with any of the companies or organizations mentioned in this article. AltamonteFamily.com has not been compensated in any way nor has AltamonteFamily.com been influenced to write about these products. This post is a result of the personal observations and independent research of members of AltamonteFamily.com. All opinions solely belong to AltamonteFamily.com.
Thank you for the great tutorial. How do I insert the new background I created into a google doc? Will I be able to put a table in front of the background? Can you tell me how to do that?
Ami, Google Docs does not currently support background images/watermarking. Hopefully one day soon it will. As a temporary work around on small documents, you can use Google Drawings to manage a page wherein the image and a text box hold what’s required. A better option may be to use an external program to insert watermarks into your PDF export of the doc. Some methods are suggested in the Google Docs communities.