Since we learned how to make mini notebooks with The Cinch, we’re always looking for things (including things that are upcycle-able and repurpose-able) that can easily be turned into notebooks. We have even used postcards and leftover scrapbooking paper as notebook covers! It has transformed (and amp’d up) our gift giving either during the holidays (both Thanksgiving and Christmas) or just because! Although we have never used any other bookbinding tools (as of the time of this post), we are quite sure that we will be using and owning The Cinch for a while.
In this post, we’ll show you how we made our own 30-Day Thankfulness journal to give to friends and family this Fall. After all, Thanksgiving is just around the corner! Time flies by faster (the older we get).
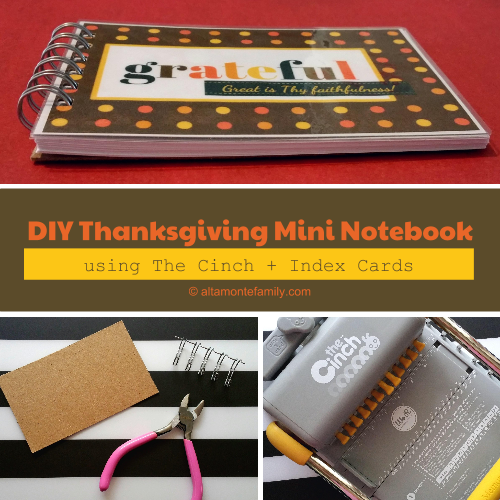
Supplies Needed To Make The Mini Notebook:
- The Cinch (by We R Memory Keepers)
- Bookbinding wire (by We R Memory Keepers)
- Wire clipper
- Chipboard
- Index cards (we used 4 x 6 for this project)
- Notebook cover (we used one of our free printables)
- Scissors
- Glue / Adhesive
- Laminator (optional – used to laminate notebook cover)
- Laminating sheet (optional – used to laminate notebook cover)
It’s always helpful to have the basic Cinch bookbinding supplies (such as chipboard, bookbinding wires, and wire clippers) handy so you’re always prepared to make notebooks whenever the bug hits you. These tools are fairly inexpensive at your local big box craft store. Other supplies such as a laminator and laminating sheets and pouches are optional. We like to use them every now and then, depending on the notebook cover, just to give the notebook a more “premium” feel.
How To Make Mini Notebooks With The Cinch and Index Cards
We decided to use 4 x 6 index cards since they’re thicker than your average notebook paper and they already come “pre-cut”! Depending on our mini notebook project, we either use ruled or unruled index cards. So, here are the steps to make mini notebooks with The Cinch:
- Prepare your notebook’s front cover, making sure it measures 4 x 6 inches (the size of the index cards) or print then cut one of our free Thanksgiving Scripture printables
- Optional: Cut a piece of your choice of card stock or chipboard and glue it onto the back of your notebook cover, to make it firm.
- Optional: Laminate the notebook cover (as long as your notebook cover isn’t too thick to run through the laminator) to give it a more “premium” feel. We didn’t use card stock for our notebook cover (we used one of our Thanksgiving Scripture printables for our notebook cover), so we were able to feed ours through the laminator very easily.
- For the back cover of the notebook, cut chipboard down to 4 x 6 inches (the size of the index cards). If desired, cut 2 pieces of scrapbooking paper down to 4 x 6 inches to cover the front and back side of the chipboard.
- For the notebook pages, gather the desired amount of 4 x 6 index cards (ruled or unruled). We used 30 sheets for our project since we created a 30-day Thankfulness journal to give our friends and family as gifts.
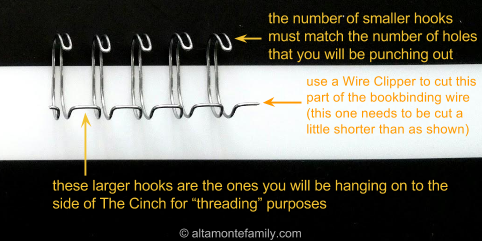
- Select a bookbinding wire with a size that can hold your desired amount of index cards. We used 0.625″ bookbinding wires for our 30-day Thanksgiving journal.
- Using wire clippers, cut the bookbinding wire down to size, based on the number of holes you’ll be punching out of your project.
Now we’re ready to use The Cinch!
How To Use The Cinch
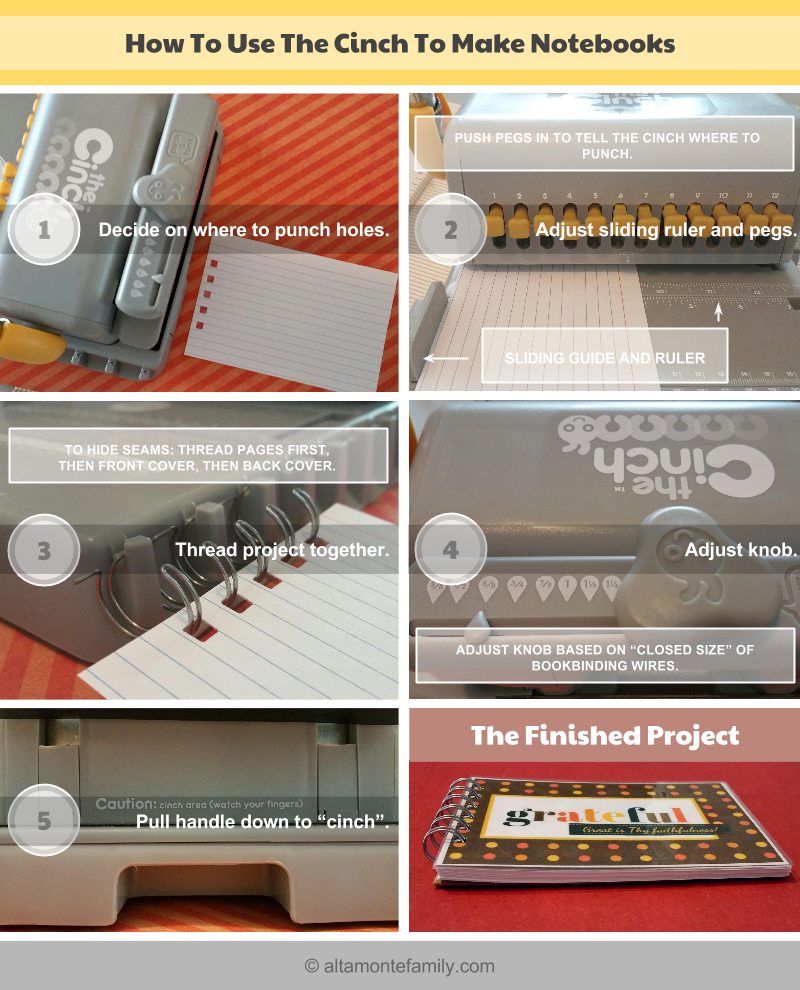
Step 1. Decide on how many holes you will be punching out of your project and where you will be punching (top of paper, left side, right side, etc.).
Step 2. Adjust the sliding ruler on The Cinch based on where you would like the hole punches to appear and then pull out the pegs where you do not want the punch holes to appear. Pull handle down to punch.
Step 3. After you’ve punched holes on all of your paper materials, it’s time to thread them together by using the “threading side” of the Cinch. Hang the bookbinding wire along the side of the Cinch, then start threading your materials: contents first (index cards), followed by the notebook cover, and finally the back cover (doing it in this order will hide the “seams”).
Step 4. After you’ve threaded your project, you’re ready to “cinch” your project together. Before you do that, make sure you adjust the knob located on top of The Cinch, depending on the “closed size” of your bookbinding wire (it doesn’t appear to be based on the size that’s stated on the bookbinding wire package). For our 30-Day Thankfulness journal, we turned the knob somewhere between 1/2 and 5/8.
Step 5. Cinch your project together by placing your threaded materials onto the “cinch area”. Remember to watch your fingers! Once you’ve properly set your materials onto the cinch area, pull down the handle (the same handle you use to punch the holes) to close the bookbinding wire. That’s it!
It’s pretty simple, right? What kind of projects have you made (or plan on making) using The Cinch?
Check out how we turned flash cards into a DIY Alphabet Book using The Cinch!
Follow Us On Social Media: Keep checking back for more project inspiration! Follow us on Pinterest, Facebook, and Instagram for updates. See ya back soon!
Disclosure: As of the time of writing this post, AltamonteFamily.com is by no means affiliated with any of the companies or organizations mentioned in this article. AltamonteFamily.com has not been compensated in any way nor has AltamonteFamily.com been influenced to write about these products. This post is a result of the personal observations and independent research of members of AltamonteFamily.com. All opinions solely belong to AltamonteFamily.com.
Leave a Reply