Are you a blogger looking to make and offer your own printables on your blog, or are you a crafter and you’d like to design your own printable giftwrapping? Maybe, you’re a little bit of both? While most people use Adobe Illustrator (not free), PicMonkey (paid and unpaid), Canva (paid and unpaid), or even Microsoft Word or PowerPoint to make their printables, we prefer using the Google Docs platform, specifically Google Draw. We’ve doodled to our hearts’ content; as a result, we have been able to offer you a variety of printables as well as digital cut files that we use with our Cricut Explore Air. In this post, we’ll teach you how to make a free printable 4 x 6 recipe card! We’ll keep the design simple, and please don’t be shy to leave us any questions in the comments.

Why We Love Google Docs To Make Free Printables
Perhaps, Google Draw isn’t the most popular drawing platform at the moment. Yes, it’s probably used more often in the classroom. And, yes… you guessed it! It’s highly used in our Craft Room!!!
We may appear to be die-hard Google fans or even Chromebook geeks (we do own Apple and PC), but here’s the thing… we think the work-offline feature of Google Docs is awesome, especially when working with graphics (did we mention that it’s fast and not clunky at all?). Plus, it’s absolutely free, as of the time of this post, and we can choose to save our work as a PDF, PNG, JPG, and get this… an SVG (scalable vector graphic)! Your hyperlinks will still work when you save your image as PDF, if you’d like to redirect your readers back to your site or a specific web page!
A quick note about vector graphics: If you’re not familiar with vector graphics, think about your image quality for a sec… what happens when you make your PNG’s and JPG’s bigger? The bigger the image, the lower the quality. Such isn’t the case with vector graphics. You can scale them in any direction (large or small) and the quality will remain the same. Woot!
Because we can make our images in Google Draw, we don’t need to rely on our own photos to make any of our printables. The canvas is absolutely blank (which could be a disadvantage to others) and this gives us the versatility we need to design using their “basic-ish” shapes.
NOTE: If you prefer working with templates and use existing images or patterns, then Google Draw may or may not be the right platform for you. We use Canva when we’re not designing our own images and only need a few basic templates to get the message across, like in the “tutorial image” below. We also use Canva when putting together images for our weekly-ish inspirational posts.

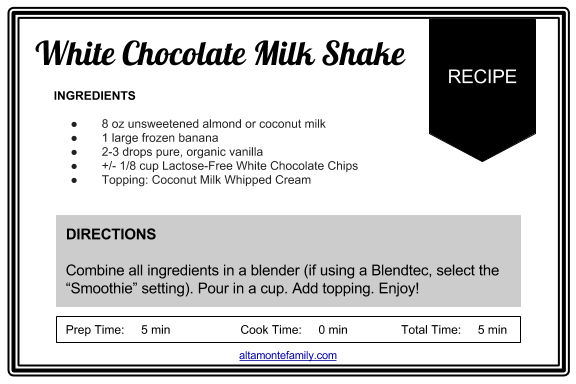
So, are you ready to make your own free printables in Google Docs? Let’s make a printable 4 x 6 recipe card! To keep things simple, let’s make our project black and white.
How To Make Your Own Free Printables In Google Docs
In case you haven’t used Google Docs or Google Draw before, here are instructions on how to launch Google Draw:
- Google’s documentation suggests going to: drive.google.com, then click New on the top left, hover over More, and choose Google Drawings
- If you have an older version of Google Drive, Google’s documentation suggests clicking the Create button on the top left, then choose Drawing
Part 1. Designing Your Recipe Card
- Decide on the size of your project and re-size your canvas accordingly (at the time of this post, Google Draw has no gridlines)
- For our project, go to File > Page Set Up; select “Custom”, select “inches”, and then type in your desired number based on the size of your project. Let’s type in 6 and then 4 for our recipe card.

- For our project, go to File > Page Set Up; select “Custom”, select “inches”, and then type in your desired number based on the size of your project. Let’s type in 6 and then 4 for our recipe card.
- Create a border by inserting a shape (go to Insert > Shape) or multiple shapes, as desired. Select your image to customize the fill color (go to Format > Fill Color), line color (Format > Lines > Line Color), line weight (Format > Lines > Line Weight), and line type (Format > Lines > Light Type) of each shape.
- For our project, let’s pick a square (basic shape) and stretch it from the left to the right to make a rectangle that almost fills the entire canvas. Change the fill color to white and the line color to black. Change the line weight to “12” (making sure your entire image still fits inside the canvas) then change the line type to “triple”.
- Insert a text box to type in the name of your recipe.
- For our project, type in “White Cholocate Milk Shake” on the top left corner of your canvas. Highlight the word “White Chocolate Milk Shake” and change the font size to “25”. We chose the “Lobster” font style.
- Insert an accent shape (which is essentially a basic shape) on the top right side of your canvas, then double-click to enter your text. Adjust the alignment (left, right, or center alignment) of your text as desired.
 For our project, change the fill and line color of your accent shape to black. Double-click to enter your text. Once you see the text cursor blinking, change the font color of your text to white (so you can see it), then type in the word “RECIPE” in all caps. Highlight the word “RECIPE” to center-align it.

- Insert a text box for your Ingredients list, just below the name of your recipe. Use bullet points to make it easy to read. Adjust the font size, style, and color, as desired.
- Insert a box (basic shape) for your Directions, just below your Ingredients list, to make it pop out. Double-click to enter your text. Adjust the alignment of your text as desired.
- For our project, change the fill and line color of the box to “gray”. We left-aligned our text, chose “Arial” as our font style, and used a 11pt font size.
- Insert another box (basic shape) for your Prep, Cook, and Total Times.
- For our project, change the fill color to white and the line color to black. Use Arial font (size: 9pt)
Part 2. Adding Hyperlinks
- Insert a text box and type in your domain name or URL.
- Highlight the domain name or URL that you just typed in, then go to Insert > Link
- Type in your domain name or URL, then click “Apply”. Your hyperlink should work once your project is saved / downloaded as a PDF.
Part 3. Saving Your Project
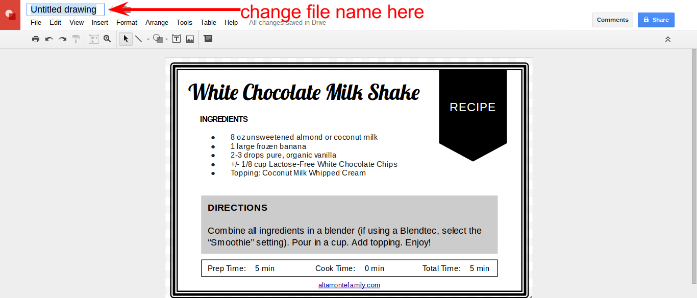
- Click on the file name / title field on the top left corner of Google Draw where it says “Untitled drawing“.
- Type in your desired project name or title.

- Go to File > Download as…
- Select PDF
NOTE: You can print this project on a 8.5 x 11 sheet of printer paper or card stock and it should come out sized as a 4 x 6 recipe card around the border. Trim down to size.
Part 4. Uploading Your Printable In WordPress
- Upload your PDF (printable) as a media file (as you would with photos and videos).
- Go to your WordPress Media Library and click on the PDF file that you just uploaded.
- Copy and paste the “File URL”.
- Link to this File URL in your download text links or buttons.
A note on WordPress plug-ins: There are a number of free and paid download manager plug-ins for WordPress like Simple Download Monitor to help you track your downloads. Be sure to review and vet any plug-in before downloading it, as some plug-ins may pose security threats for you and your readers.
A note on WordPress security and free printables: Be very vigilant re: your WordPress security especially when offering free downloads. We had a terrible experience with hackers using multiple brute force attempts and injecting all kinds of malicious code (that readers couldn’t see) and “invisible” spammy links especially on our download pages. We immediately corrected this by taking down our site and switching to a managed WordPress host. We switched to the Rainmaker Platform (affiliate link) so we no longer have to worry about plug-ins and just focus on creating content. If you can’t live without your plug-ins and prefer more control over your blog or website, then we suggest looking into other managed WordPress hosts like WP Engine (affiliate link–use coupon code “FASTSITES” to save 10% off your first payment, expires 10/31/2015), Synthesis (read our story here), etc.
That’s it!
Congratulations! You just made your own free printable recipe card in Google Docs!

Check out our other Google Docs tutorials for our craft room:
- How to make your own Cards
- How to make your own Gift Tags / Labels
- How to design your own Backgrounds
So, how do you like using Google Docs in your craft room (or kitchen)? We’d love to exchange ideas with you!
Follow Us On Social Media: We’d love to hear from you on Pinterest, Facebook, or Instagram! Or, give us a shout on Twitter!

Thank you! I was looking for recipe cards that I could make my own. This was a perfect tutorial!
Thank you. Was also looking for a tutorial on how to make recipe cards. Worked perfect thanks!
Just finished my sample recipe card. I think my daughter will try the recipe, and I have a new tool in my Google box! Thanks so much for the tutorial…and the recipe.
BTW, how much of those white chocolate chips should we use??