That moment when you start expecting more from yourself, because…
You own a Cricut Explore Air.
And you’ve heard it all–that this awesome machine can pretty much do anything or cut through anything…
Somehow, you suddenly feel as if you have to step up your crafting or party planning skills or what not…
Just because you own a Cricut Explore Air.
***Okay, you can snap out of it now!!!***
It’s just a tool. It’s a means to an end. It’s not supposed to dictate your creativity, your ability–and it’s certainly not meant to add on any pressure.
It’s okay–really, it is.
If you still have to buy birthday cards, graduation cards, etc. (hey, that’s us!)–simply because you’ve been too busy or you’re just not feeling crafty (that’s us, again)…it’s okay.
That moment will come–when you finally have the power to ignore your new Cricut Explore Air, when you can finally stop scouring through Cricut Design Space just to find a project that you like–or marginally like (just because it fits the bill and you’ve already run out of time).
That moment when you suddenly experience a creative a-ha! moment and you can finally take control of your Cricut Explore Air–and get this–WITHOUT the need to buy expensive graphic design software or force yourself to work around somebody else’s designs.
Don’t get us wrong…we really do appreciate all of the existing work and project ideas that are already available on the web as well as on Cricut Design Space. It’s just that, sometimes, we creatives have this burning desire to create something that’s uniquely our own (or at least, we’d like to think so).
In any case, we’re here to divulge that you can easily create your own cut files for use with the Cricut Explore Air FOR FREE, using Google Draw!!!

Let’s start with graduation party decor…
How To Create Graduation Party Decor Using Google Draw & Your Cricut Explore Air
DIY Graduation Party Decor – Project #1:
- Head on over to Google Draw and insert a text box.
- Say, let’s type in, “Congrats” and use the “Pacifico” font.
- Resize according to your wishes, download it as a PNG, and viola! We have a cut file!
Now, you will just need to upload your own image into Cricut Design Space.
This is what our finished cut file should look like:

DIY Graduation Party Decor – Project #2:
- Launch Google Draw once again but this time, we’re going to insert 8 text boxes total, one letter per text box, in the following order: C-O-N-G-R-A-T-S
- Choose the Luckiest Guy font and make sure that each text box has the same font size and attributes.
- Stagger the position of each text box and rotate some of the letters (optional).
The idea is–we need each letter to stick to each other so that they become one whole unit. Why? We really don’t like having to glue each letter separately. We’d like for our projects to be done or almost-done by the time the Cricut Explore Air is done with them!
Your digital creation will look something like this:

DIY Graduation Party Decor – Project #3:
- Let’s go to Google Draw one more time. Insert a shape and choose the diamond. Actually, let’s insert a total of 8 diamonds!! Make sure the diamonds all have the same attributes and position each one of them so that they are all interconnected, like a diamond chain. You might want to group these 8 diamonds together to prevent accidental shifting.
- Copy this entire set of diamonds and paste another set right below it. This second set of diamonds will be our “shadow box” after we cut out the images using the Cricut Explore Air.
- Now, it’s time to insert 8 text boxes, again!!! Only choose 1 set of diamonds and insert a text box inside each diamond, making sure that the font attributes of each text box are all the same. Just like what we did in Project #2, let’s insert 8 text boxes, one letter per text box, in the following order: C-O-N-G-R-A-T-S (make sure your text boxes are aligned in the center of each diamond)
And here are the results…

You could easily create a large banner with this file using Cricut’s 12 x 24-in. paper and cutting mat!
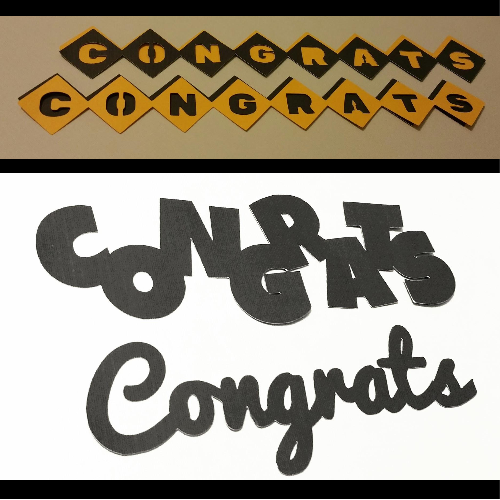
These are the results after running each cut file through the Cricut Explore Air:
Please Read This First: It’s important to note that these files are automatically uploaded as “Print-Then-Cut” files when you save them in Cricut Design Space. We manually switched all of them to “cut files”, just to make our lives a whole lot easier.

We’re thinking–graduation party banners, cupcake toppers, and all other kinds of stuff! These would look fabulous on gold or silver metallic poster board!!!
What do you think? What can you see yourself making with these cut files? Better yet, what can you see yourself making using Google Draw and the Cricut Explore Air?
Now go forth and create!!!
Disclosure: As of the time of writing this post, AltamonteFamily.com is by no means affiliated with any of the companies or organizations mentioned in this article. AltamonteFamily.com has not been compensated in any way nor has AltamonteFamily.com been influenced to write about these products. This post is a result of the personal observations and independent research of members of AltamonteFamily.com. All opinions solely belong to AltamonteFamily.com.
Leave a Reply